Saxophone Altissimo Systems and Your Hidden Second Octave Key
Learning to play in the altissimo (extreme upper) range of the saxophone requires patience, mostly on the part of the player, but also for whatever unlucky souls are forced to listen to your squawking. Progressing from squeaks to music is a process, but there are basic principles that should be isolated if you want to learn to control this demanding range of the saxophone.
2 key elements to playing in the altissimo range:
- Throat Control – practice your overtones! There’s lots of literature on this, but Rasher’s Top Tones is the bible. Most of altissimo playing is controlled by your throat, not your fingers, so you MUST start here.
- Fingerings – the saxophone wasn’t built to play in this range, and many “standard” fingerings are cumbersome to execute.
How can I settle on the right fingerings?
Ok, so you’ve developed great throat control through lots of overtone practice. But your technique is still not all that advanced up there. There are dozens of fingerings for each note on various fingering charts (see Ted Nash’s Studies in High Harmonics for a good reference), but most offer no guidance for which ones should be used together. Unfortunately it’s not so cut and dry, read on.
About 2-3 months ago, I was in a small group lesson with a true altissimo master, Ben Wendel. Being the unapologetic saxophone geek that I am, I asked about his altissimo fingering system. He patiently walked us through all his fingerings, but he also reinforced that the exact fingering system you use is less important than having great throat control, paired with a fingering system that’s comfortable and reliable. I ended up changing many of my fingerings as a result after much exploration, adopting a handful of Ben’s but also finding some of my own that just work better and are less cumbersome.
In my quest for my perfect system, I looked for the right combination of the following 3 elements:
- Fluidity – the more easily you can move from one note to another, the more technical mastery you will be able to gain.
- Intonation – Although fingerings are of far less importance than how you control each note, I prefer a system that trends a bit sharp, allowing me to loosen my embouchure and spare my chops.
- Stability – every saxophone is different, and some notes just speak better on each horn than others. You want to find fingerings that you can reliably hit and control.
Interested in jazz saxophone lessons in the Los Angles area or remotely? The Woodshed author Mike is now accepting students! Learn More >>
…
My tenor altissimo fingerings
These may or many not work for you. However, this is the set of fingerings I currently use on tenor, and they are helping me reach the next level with my altissimo playing.
Here’s me taking them for a quick spin:
A hidden second octave key?
Take a look at the above system. One thing you may notice is that for every note above G, I keep down the third finger of my left hand (G-key) as well as the side C. It definitely takes a bit of getting used to: you need to learn to relax your left hand while keeping these fingers down, which is unnatural. However, you’ll find that this key duo is an incredible altissimo stabilizer, acting as a second octave key just for the altissimo range! Will it do much for you if you haven’t done lots of throat study? No. But with the right foundation, it’s certainly helps. Take another look at the fingering chart:
Parting Advice
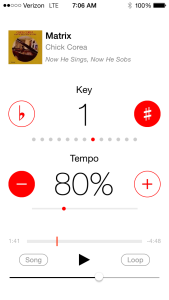
Highnote App: 1-tap key and tempo change, on the fly
In the past, I’ve used various pieces of software to alter the tempos and keys of recordings. Whether I want to slow something down to more easily transcribe a passage, or work on playing in different keys, the process involves (1) uploading said track so some program (i.e. Audacity, SlowGold, etc.), (2) finding the right combination of transformation buried in the dropdown menus, and (3) then waiting for the track to process. Plus, I need to be in front of my computer.
Enter Highnote. It’s an iPhone app that allows you to take any track that’s on your phone’s iTunes, and in a single tap, change the key, tempo, or any combination of the two. Similar to my previous post covering 3 groove and intonation focused apps, this is a hyper-focused app with a focus on clean and effective execution. Want to play over giant steps along with Coltrane, but up a half step? No problem! Need to slow that down a bit to get the hang of it? Done!
Although $4.99 is app-expensive, you’re going to get so much more out of this than the $5 stomach ache you earned from the Venti Skinny Double Cinnamon Dolce Latte you ordered this morning. Gross.
I love to play along with my favorite recordings. It’s not only fun, but also beneficial. Your improvisation, melodic phrasing, and feel are all being influenced by your favorite musicians—a bit of jazz osmosis. Here’s a clip of me taking Highnote for a spin, playing over Autumn Leaves off one of my absolute all time favorite recordings, Cannonball Adderley’s Somethin’ Else. I start a 1/2 step up from the original, and as you can see, changes to key and tempo happen on the fly and instantly, allowing you to keep working over the tune without losing a step. Happy shedding!
Experimenting with Melody, Harmony, & Rhythm
“…it’s so hard to describe music other than the basic way to describe it – music is basically melody, harmony and rhythm – but I mean people can do much more with music than that. It can be very descriptive in all kinds of ways…”
~Charlie Parker from an interview conducted by Paul Desmond (1954)
The more I ponder Bird’s fundamental decomposition of music, the more I discover how aptly anything musical can be described by its harmony, melody, and rhythm. There’s still that lingering, intangible “much more,” the part that gives music meaning. But let’s save the “much more” for another post…
As improvisers, we strive to use our instruments as a medium for channelling the musical thoughts that are trapped inside our mind’s ear. When I sit down to practice, I want to focus my routine around activities what work the mental and physical muscles that will get me closer to this goal on two fronts: working on my ability to execute the sounds I hear is one piece of the puzzle, but I’m also constantly looking to develop my ear and my mind’s ability to imagine new sounds. These sounds can be harmonic, melodic, rhythmic, or a some combination of the three.
Here’s one approach I’ve used to structure my practice routine around this goal.
Core, Ear, & Mind
As I delve into any new concept, my abilities will evolve with continued practice.
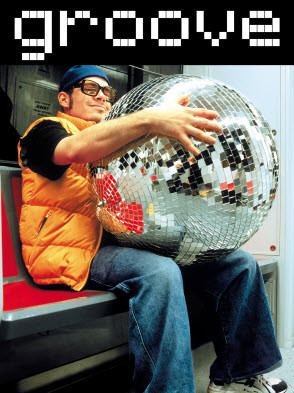
3 iPhone Apps That Improve Your Groove & Intonation
As some of you may be aware, my day job is in mobile app software development. So, when I come across useful, intuitive apps that actually help me solve real problems that I face as a musician, I get really excited!
I’ve been using Pitch Primer and Time Guru with some regularity for over a year now. I recently also came across Double Time, and let’s just say it’s revealing glaring issues in my time, which you will witness for yourself below. These apps might not win any design awards, but the highly specialized utility they offer makes them invaluable practice tools.
Let’s go through each of these three iPhone apps, and along the way I’ll demonstrate how and why I use them in my quest to become a better musician.
Sorry Android users, only Time Guru offers an Android version, but please, don’t even get me started with the follies of Android…
DoubleTime
As I said above, this one is relatively new to me. Developed by fantastic jazz pianist Dan Tepfer, DoubleTime‘s basic premise is that you can learn to feel the groove by incrementally spacing out metronome clicks. That’s the app’s killer feature – a big button that says DOUBLE – allowing you to easily “double” metronome click intervals with a single tap, so you don’t miss a step. It’s so simple, yet so brilliant. Dan is a wonderful solo/duo player, so if this is the process he’s using to improve his internal rhythm, there must be something to it!
In the example below, I improvise over the standard All The Things You Are at quarter note = 240bpm. I’ll start with clicks on beat 1 of 4 (clicks every 60BPM = one second) and begin to play the tune. Each chorus, I hit the DOUBLE button. Here’s a play-by-play of the embarrassment that ensues:
An Improviser’s Tour de Fourths
Back in the late 60’s and 70’s, fourths were the hippest thing since sliced bread. Jazz entered the age of treble-heavy bass and electric fusion, and musicians were overlaying fresh-sounding (at the time) intervallic fourth patterns over all sorts of funky modal groove tunes.
But fourths are so much more than just a few licks to plug in. Let’s explore the harmonic and intervallic possibilities the fourth creates. I hope to open your mind, your practice routine, and your playing. After all, it’s called a perfect fourth for a reason!
Let’s start from the beginning and work our way up.
What is a fourth?
Let’s take 10 seconds and cover the extreme basics. The fourth is an interval. In the key of C, moving from C to F is moving from 1 to 4 if you number each note sequentially:
Harmonically speaking, the fourth takes a similar form. In the key of C, an “F” chord is known as the fourth.
Building a Major Scale Out of 4ths
300 Tunes to Know: Prioritized, Categorized, and Organized

Tunes are our shared language. One of the most beautiful and unifying aspects of jazz is this common musical familiarity that enables any group of seasoned musicians to get together and immediately start making music. I’ll cover the pros and cons of learning tunes as well as the right approach to building a solid base of tunes in your arsenal. At the end I give a list of tunes to learn, separated out by their importance based on the frequency with which they get called at sessions/gigs.
=&0=&
A Transcriber’s Evolution: Your Routine Should Grow With You
In case you didn’t already notice, this is a blog, thus I’m going to try to use an infographic to communicate an idea. Read below the graphic for more information.
As a saxophone player I’ve transcribed many, many saxophone solos. When you’re starting to learn jazz, transcription is one of the first pieces of advice you’ll receive: “Just transcribe a bunch of solos!” says random Joe jazz mentor/teacher.
But why do we transcribe?
And what is the best process? It can be tedious, but is the payoff to build your vocabulary, give your ear and notation skills a good workout, emulate the sound/style of one of your idols, to just figure out what the hell somebody is playing? Yes to all these things, but I’d argue that the value of transcription evolves as you develop as an improviser.
In the early stages of your foray into jazz improvisation, you can use transcription as a tool for starting to make the connection between the chord changes and the note choices an improviser makes. Knowing to play a C-major scale over a Cmaj7 is one thing, but understanding the standard language over a c-major within the jazz idiom takes a lot of listening and transcription.
As you become more fluent in the language of jazz, you will begin to understand most of what you are listening to without even writing it down. They are playing a language that you have spent many hours studying. Just as you don’t need to open your Spanish-English dictionary to know how to place an order at a coffee shop in Peru after studying 8 years of Spanish, you will begin to hear most of the lines and harmonic choices made by jazz musicians in real time. At this point, I generally use transcription to decode somebody’s harmonic and melodic language. That can be either taking a single line, or in select cases an entire solo, and figuring out what they were playing.
Stick to your instrument?
Many improvisers stick to their own instruments, and for good reason. Say you’re a sax player. In the early stages of your development, you will get the most out of a sax transcription. Your aim should be to learn the solo exactly as it was originally played, every inflection and detail should be copied.
However, as you evolve, you are getting less value out of the instrument-specific aspect of transcription and can draw more from the theoretical side. Look to other instruments to expand your range.
Aaron Goldberg over “One Finger Snap”
In that spirit, here’s a transcription of Aaron Goldberg on his contrafact “Head Trip” of Herbie’s “One Finger Snap”.
Aaron Goldberg – Head Trip – C
Currently Listening To Bud Powell, Time Waits
Practice Ideas, Not Just Licks
I’ve been obsessed with harmony lately. Those of you who read my last analytical post on harmonic discipline might have guessed as much (yes, I still owe a follow-up to that post, and it’s coming soon!). Specifically, I’ve been experimenting with ways to expand my harmonic vocabulary.
Transcription: a place to start
You know those points in a solo where one of your idols plays an interesting line, something a little unexpected (out), and you think to yourself, “that was cool, but what was it?!” Maybe you’ll go and transcribe that lick; motivated students of the music will probably learn it in all 12 keys, and now you have something cool and new to add to your improvisatory arsenal.
But are you really learning the idea or just the lick?
There’s a critical distinction between plugging in a line and going for an idea.
A lick is limiting: you know a sequence of notes that, in the right context, sound pretty cool. You’ll spend a ton of time learning a lick, then either forget to plug it into your solo or forget it altogether.
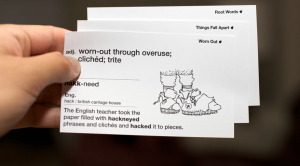
An idea is a springboard: you have absorbed the sound of the harmonic or rhythmic gesture you are going to play, and you can freely move in and out of that concept at will. It’s part of your vocabulary, something you have conviction in, and not just a soundbite you’ve memorized or a vocab card that your 9th grade English teacher tested you on (you crammed for the test, never applied the new vocab word in your writing or everyday speech, and thus promptly forgot the meaning of “mercurial” about 15 minutes after the test ended).
Using licks to expand your lexicon
Ok, enough with the lick-bashing. I’ve actually found that licks are a fantastic vehicle for bridging the gap between “holy crap, what did that guy play?!” and gaining complete mastery over a new harmonic or rhythmic idea.
Let’s walk through an example. I’ve been digging the sound of “sidestepping” up a minor third in minor keys: i.e. over a C-minor chord, moving back and forth between Cm and Ebm. So, I sat for a minute and worked out a little line that gets me in, out, and back in again:
Now you could go home, steal my little lick, and have a nifty nugget to plug into your next solo. But that’s not the point. Remember the goal: to master the superimposition of the minor that’s a minor-third above the tonic.
Here’s what I’ve been doing to try to drive home this new concept:
5 Steps to Finding Your Sound Through Imitation
When you hear John Coltrane, you immediately know it’s Trane. It’s not the notes he’s playing or his dazzling technique that makes him sound uniquely like himself. It’s his sound. Every jazz musician, at some point, ventures into the abyss in search of their own, unique sound. Your sound is what makes you, well, you. But where do you start?
Let’s begin by defining the core elements that determine one’s “sound”:
Playing the Changes: It’s what separates the men from the boys.

Jazz improvisation is inherently subjective. What makes one solo “better” than any other is often a matter of taste, a preference for a given style. But while articulation, swing feel, and phrasing vary wildly from one great player to the next, every noteworthy improviser is able to effortlessly demonstrate a tune’s chordal movement. Just as any writer worth her salt showcases complete mastery over grammatical convention, the conversant jazz musician must be fully in command of the harmonic structure on top of which they are improvising. Simply put: You’ve gotta be able to play the changes!
Arguably even more important than their virtuosic technique and impeccable rhythmic feel, what makes the great players truly great is their unshakable fluency of harmonic language. Until you are playing all the changes over a tune, your not really playing the tune. All the cool licks in the world won’t make you sound any more proficient than a truckload of glue will convince anybody that little Tommy’s mustache is a all-natural, glorious Tom Selleck.
What does it really mean to be able to “play the changes”?
For those of you who may be unfamiliar with the terminology, the “changes” are the chords that were originally composed to support the melody of a song. Many musicians first face chord changes by being presented with an excerpt from a Real Book, known as a lead sheet, which states the melody and chords to a given tune. As these changes are flying by, it is the job of the jazz musician to spontaneously compose a line that fits within the context of the harmony. More advanced jazz musicians will occasionally superimpose other, more complex harmonies on top of the original chord changes, with the intention of eventually resolving back to the originally composed harmonies to give their superimposition context. Some call this playing “out” and then back “in” [the chord changes].
Learning to play the changes takes many years of focused listening, practice, and patience. However, I’d like to offer
4 simple tips that will get you headed in the right direction